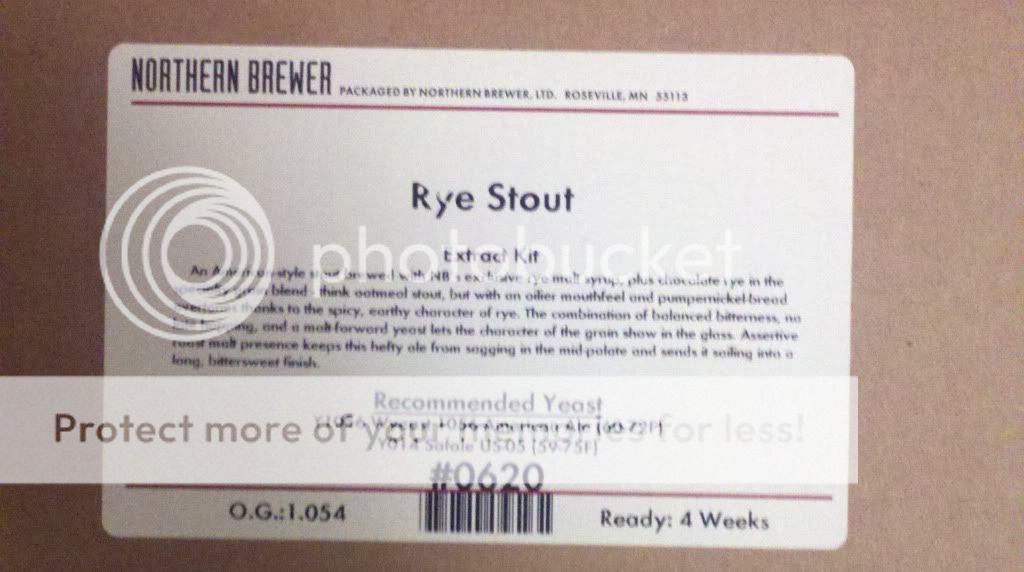
Last week I started my first brew, a rye stout extract kit from Northern Brewer. I decided to use this kit because a stout tends to be more forgiving, winter is approaching and stouts are great for winter, and to be honest, I love the shit out of some stouts. It comes with a chocolate rye grain, Simpson's black malt, Simpson's dark crystal, and some special hops called "Warrior." This beer is a bad mutha already, just based on the stuff that went in! I mean look at those names. Are you kidding me? I've decided to name it Leviathan because of the huge flavor profile that it's going to end up with, a pseudo-ode to one of my favorite albums (Leviathan by Mastodon) that has a lot of hard-hitting guitar and bass riffs, punchy, intense drums and some heavy growling vocals. Great album, great band.
It was a lot of fun to make and pretty easy. In fact, it's very similar to making boxed macaroni and cheese, only it takes hours instead of minutes. I had to boil the extract and hops first. It takes forever. For the first 20 minutes, I steeped the crushed grain in a mesh bag then removed the grain and brought the pot to a boil. The mesh bag is the "sock" thing there in the picture below.

Then I added the extract and dissolved it in the steeped liquid. I brought it back to a boil, and let me tell you - 3 gallons of thick syrupy liquid takes forever to get rolling. It smelled awesome at this point. Joe, my roommate, kept saying he wanted chocolate chip cookies. I added the warrior hops, which are really designed more for IPAs and such, and my wort (what the beer before fermentation is called) really started to smell like beer. 60 minutes later, the wort was ready to cool.
Cooling about 3 gallons of wort that's been boiling for an hour is no easy feat. It has to cool to about 70 degrees in order for the yeast to be added. I initially put the pot in the sink and ran some water on it, but that didn't work so well. Then I tried plugging the sink and adding a 10lb bag of ice, mixed with water to cool it. It sort of worked but the ice was melting really fast and nothing was cooling. Then I remembered a show I had seen once about how to cool beer quickly if you had guests coming over and the beer wasn't cold yet. They tested out putting the beer in the freezer, putting it on ice, putting it in ice water and putting it in ice salt-water. The salt-water got the beer nice and cold in about 40 minutes supposedly because the salt lowers the freezing temperature of the water. I had no idea if this was going to work for cooling my wort, but I had to try something! I added a bunch of left over sea salt to the water, and sure enough in about 30 minutes the boil kettle with the wort was cool enough to transfer to my tub for further cooling. I should mention I live in a small apartment and don't have a lot of space, so putting the boil kettle in a CLEAN (I emphasize clean here, because yes, I know what most people's reactions are going to be) bathtub with cold water. In about another 15 minutes, the wort was cool enough to pour into the 6g carboy.
I got the water and wort, a total of 5 gallons, into the sanitized 6 gallon carboy and I added my yeast culture. I used Wyeast 1056 American Ale for this. Earlier in the day (about 3 hours before brewing began) I started the culture up by smacking the pack to release the nutrient pack and get the yeast growing. They start off like a vacuum sealed pack. After a few hours of growth and gas production, the yeast pack looks like this:

That baby is ready to explode!!! I aseptically (sterilely, if you will) got the yeast into the wort. I took my specific gravity and got a reading of 1.056. The starting specific gravity (SG; it's OG for the initial reading and FG for final) of the kit should be close to 1.054, so I was pretty close (only I wasn't quite correct, as I'll explain in a minute). In a nutshell, the specific gravity is how dense the beer is. It gives you a readout of the alcohol content and how far along fermentation is. I sealed the carboy with the blow-off tubing, swirled it around a bit to aerate the mixture and get the yeast all nice and happy, covered the carboy to protect it from light and was good to go!
A couple of notes here. Light, of any kind, ruins beer. Ever had a skunky beer? That's partly because of light. Chances are it's because of light in the bottling process, not the fermentation process as most huge breweries use large stainless steel fermenters that prevent light from getting in. Also, that's why beer in clear glass or green glass tend to be skunkier than brown glass - ever notice how all the great, expensive beer always comes in brown glass or completely opaque bottles? That's why. Also, most great beer comes with pry-off tops, not twist off, because air ruins beer, too.
The blow off tubing is used for the first few days of primary fermentation because during that time, there is a HUGE release of gas and energy and the wort bubbles and foams and spits and all kind of stuff, so the tubing allows for a release point for everything so the carboy doesn't go boom. There are fermentation locks which are used for subsequent steps, but they clog and get all nasty during the first steps of primary fermentation, meaning you have to clean them and that just opens the door for more oxygen and microbes to get in a ruin the beer!
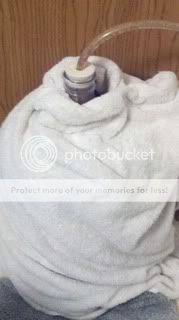
Here was my set up as of 2 days ago:
Ok, so here's when things get tricky. About 3 days ago, I noticed that I couldn't hear the bubbling of fermentation anymore. At all. The first few days all I could hear from my bathroom was "Glub glub glub" of the gas leaving the blow-off tube into the sanitizer (done this way so that no air gets back into the tube, ruining the beer). Yesterday I went and removed the towel and noticed that the krausen, or foamy head, had gone away. 1 week in and my yeast had stopped fermenting! OH NO! I switched out the blow-off tube to the smaller, more sensitive fermenter lock. I did some reading and question asking, and it turns out, 1 week is typical for primary fermentation, but not guaranteed. Sometimes it takes up to 2 weeks. After that, the krausen falls back into the solution and it's time to take a SG reading. I did some MORE reading and found out that for beer the best fermentation happens at 60-70 degrees F. Our apartment has been consistently between 70 and 80 degrees F, and too high of a temperature results in really heavy alcohol flavors, more like everclear than beer. I was starting to get really worried last night and today. I looked back at my original specific gravity of 1.056 and found out that hydrometers (the instruments you read SG with) are optimized for 60 degrees F, and that any differing temperature has to be taken into account for the SG reading. My OG was actually closer to 1.060 or 1.062. That doesn't sound like much, and in reality it's not awful, but my heart sank. I thought my beer was done for. The combination of no bubbling, miscalculated specific gravity, and the temperature had me certain I had ruined my first batch of beer. Me, a microbiologist, can't even brew beer. I was pretty unhappy.
Not to worry though! I took some suggestions and read my specific gravity today when I got home. It was 1.017, which is really really close to the FG that I was expecting to end up with (somewhere near 1.015). My primary fermentation was over, that's why the vigorous bubbling and frothing had ended. I sanitized my 5g carboy and decided to go ahead and do a secondary fermentation. A secondary fermentation is when you siphon off the beer after the initial fermentation to reduce the amount of yeast sediment (dead yeast, gluten, etc.) that sinks to the bottom of the carboy during primary fermentation. The main reason is to clean up the taste of the beer, making more pure and less "yeasty."Some people and some recipes even go for a tertiary fermentation. I'm not there yet, though.
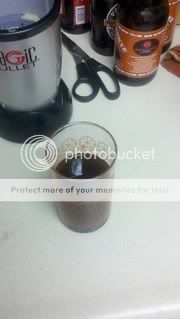
Here's what the sediment looks like:


The one on the left is the sludge with a bit of the beer left in during the siphoning process. The one on the right is once it's nothing but sludge. It looks like melted ice cream, doesn't it? I can assure you it's nothing like ice cream, unless you want sour beer ice cream. There was probably a good 1/4 to 1/3 of an inch worth of sludge at the bottom. Those yeast grew like hell, apparently.
Here's the secondary fermentation set up. I put my 6g carboy from the primary fermentation set up on the counter and used an auto-siphon to get the beer into the smaller 5g carboy on the floor. I also put paper towels in sanitizer and put them over the tops of the carboys to prevent any contaminants from getting in.

I took a sample before I siphoned the beer, and it tastes really good! I mean, it's good for warm, flat beer that still has yeast floating around in it...

Next up - bottling! I have about a week in secondary fermentation, then I am going to bottle the beer and bottle ferment it for about 2 weeks. Then it'll be ready to drink! 4 weeks total - not too bad, I have to say.
This just makes me want to brew beer even more! The wine takes FOREVER. :) You should talk to Kristi - she just started brewing beer, too, and she built a grain mashtun so she doesn't have to use the extract kits!
ReplyDeleteI like your magic bullet!
ReplyDelete